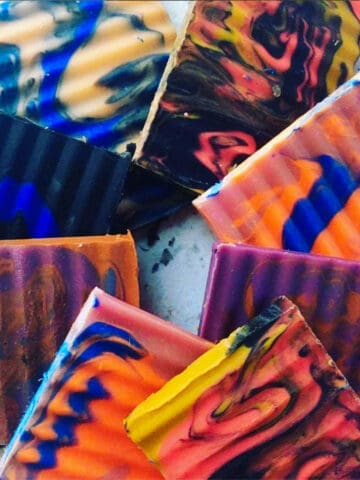
There are different kinds of swirling, everything from peacock, funnel, drizzles, layer swirls. Sometimes we pull a comb, sometimes we drizzle in layers, sometimes we simply swirl much like we would if we were baking.
This swirl tutorial is much like making a pan of brownies that you are swirling in a cream cheese and fudge component on the top. In this type of swirling, you will be cutting your soap into squares or rectangles, much the same as you would be cutting out cookie bars or brownies.
The swirl effect is concentrated more on the TOP of the soap, with less visible swirling in the depth. This type of swirling is not very effective in soap logs where you will be slicing your soap like slices of bread… these swirls do not go deep enough./
So, first you will need a soap mold that will allow you to pour your soap to no more than 1″, 1 ½″, or 2″ deep. Typical bars would then be cut out like cookie bars in the size of perhaps 2 ½″ x 3 ½″ with the swirl design only on the top surface./
Blackberries & Sage Cold Process Soap.
Ingredients:
- 8 oz Coconut Oil, 76 degree
- 7 oz Olive Oil
- 12 oz Shortening, vegetable
- 3 oz Palm Kernel
- 3 oz Babassu
- 11 oz water
- 4.8 oz sodium hydroxide (for a 5% lye discount/superfat)
- 2 oz Soapalooza Blackberries & Sage fragrance oil
- Colorants: 1 teaspoon Titanium Dioxide, ¼ teaspoon Chromium Green Oxide, ⅔ teaspoon Violet Ultramarine. Mix each of these colorants ahead of time with a teaspoon of hot water, and set to the side to be used later.
- 2 small bowls
- 1 ‘brownie pan style” or Slab soap mold, silicone lined or plastic paper lined previously.
oils, lye, and water come to 48.8 oz, and cure up to 39.4 oz weight. This is considered a “3 lb” batch of soap.
How to proceed:
Weigh out your water into a plastic container. Since the water and sodium hydroxide get extremely hot, choose a container that can handle heat: Rubbermaid pitchers are my go to.
Weigh out your sodium hydroxide. Slowly add the sodium hydroxide to your water in the pitcher. Stir slowly until it is dissolved, taking care not to breathe in the fumes or splash, as this is caustic and HOT. Let your sodium hydroxide and water cool down to just a slightly tepid to cold temperature.
TIP:
Water weighs the same liquid or frozen. You can reduce your cooling down phase time by weighing half of your water as ice cubes (½ water and ½ ice cubes). Stir slowly and constantly when adding the sodium hydroxide to your ice water solution.
While your sodium hydroxide solution is cooling, measure out your oils. Start with the solid ones first, such as the vegetable shortening. Measure it into your stainless steel pot, and melt it. Turn off the heat and use the remaining heat to melt the coconut, palm kernel, and babassu. Last, add your olive oil. This process of melting the oils that require the most heat first, then adding the liquid oils last, will allow your hot oils to be cooled rapidly, and you will not have to wait so long to make your soap. It will also ensure you don’t process soap with too hot of oil temperatures. I typically process my oils at about 85 to 90 degrees and my lye solution at a cool room temperature. You do NOT need your oils and sodium hydroxide solution to be the same temps.
Next, Pour your cooled sodium hydroxide solution slowly as a thin stream into your stainless steel pot holding your melted and cooled soap oils. Stir with a spoon while adding your sodium hydroxide solution. Next, add the 1 teaspoon of Titanium Dioxide to a small cup, add 1 teaspoon of warm water and slurry. Now add this to your soap pot. Using a stick blender, mix your soap oils and sodium hydroxide together with the 1 teaspoon on Titanium Dioxide until you have a thin, white liquid. Last, add your fragrance oil to your soap mixture, and mix again with your Stick Blender to fully incorporate. Do not over mix!
Ladle off approximately ½ cup of soap mixture into two small bowls, or better, the 1 cup Pyrex pitchers. Add your Chromium Green oxide to one, and the Violet Ultramarine to the other. Gently stir in with a spoon… do not stick blend these yet.
After preparing your swirling colors, bring the main portion of your soap mixture to a medium trace. This means you and drizzle your soap mixture and trails will show on the surface but quickly be absorbed by the soap body and disappear. This is the best time to pour into your ‘brownie pan type” or slab mold. Spread your soap mixture evenly in the mold, the same way you would spread out brownie batter in a cake pan
Next, using your stick blender, bring the bowl with the Violet UM to a medium trace. You can either quickly rinse your Stick blender before proceeding to the Chrome Green, but the green is strong enough to hide the bit of violet soap mixture on the stick blender. After bringing the Violet to medium trace, bring the Chrome green soap bowl contents to medium trace also.
Your colored soap bowls should still be fluid enough to “flow”. Drizzle the contents of the green colored soap and the violet colored soap over the top of your poured white soap mixture. After bowl contents are evenly distributed, use a table knife, spatula, or a spoon to “cut” through your soap, pulling the color into trails and tendrils as you fancy.
Let your soap sit for 12 to 24 hours until firm and set up, then turn out and slice. Cut into dimensions of soap bars much like you would cut cookie bars, and your beautiful soap swirls will remain on top! Let cure 3 to 4 weeks before using so that the water content evaporates and you have hard, long lasting soap.
You can connect with Soapalooza using social media now:
Facebook Soapalooza Fan Page
Facebook Soapalooza Group

Leave a Reply